Righteous Kombis Blog

This is Sunny, a 1975 VW Kombi Microbus with a 2-1 bench seat up front. We’ve been working on this project through the winter months, and I reckon it’s time we wrote a story about him. When we moved out of the workshop, both my panel beater and myself took a well earned rest from the Kombis, but we had one spare Kombi that was straight, rust free, and all the parts and equipment were in good working order. So rather than bust our guts we decided to enjoy the journey and take some time to enjoy the process from the comfort of our own garage. Over the past 3 years we’ve experimented with a few design ideas and finishes, so this was a nice way of pulling them all together and making a complete project for ourselves. 
As for the colour – we wanted to create a deeper, richer tone of yellow while maintaining the classic 2 tone colour scheme. We stripped out the interior seats, door cards, flooring, headlining and window rubbers as they were all looking pretty tired after 40 years of adventure. That also gave us access to the floor pan, window sills and hard to reach spots that often hide the rust.
We've seen some really poor kombis this year, but this little guy only had a few scrapes down the side. The left door step had a bit oof rust under the rubber and a few cuts had to be made around the tail. The most annoying thing is when you start rubbing back the roof, and you discover all those tiny pin spots under the original enamel. These all have to be brought back to a healthy shine before the joyous cycle of - prime, rub, undercoat, rub, 2 pak, buff - can put a lasting finish in place.

Every surface that needs a respray must be cleaned and prepared and primed, or you may as well not bother. I have seen some awful reactions between an old coat of enamel and a fresh coat of 2 Pak. This Kombi had an exeptional floor in both the front and back, so we were able to give it a light rub down and soften the base with some prepsol before laying down some primer, stone guard and then finishing with a top coat of 2 pak.

We've skipped the traditional headlining and gone for a marine grade carpet headliner. This might sound like its easy, but it means rubbing back all of the ceiling framework and rear hinges, priming, sanding and finishing in 2 Pak, before carefully glueing in the sections of headliner. It involves a lot of effort getting the edges tucked in and looking tidy so the paintwork really stands out. We've done this before on a few of the kombis because it gives the feeling of more headroom and doesn't suffer from an impact with a surfboard fin.

One of the things I like about the kombi business is how so many parts and fittings are traded, swapt and haggled over to eventually get your customised look. I have never seen 2 kombis the same and this will be no different! The 5 spoke empi wheels were horse-traded for a rear seat that went into the back of a splitty. A new steering wheel and some rubber seals were traded in return for some respray work, and the spotlights were swapped for an old bullbar.

The seating compliance is for a full 9 seat capacity as there is the bench seat in the front. However we opted to remove the middle bench seat to provide more room and versitility in the back. All new door rubbers and seals complete the look. A full mechanical report is available for this little gem to help take some of the worry out of the buying process. You can check out his ful bio on the Righteous Kombis Ad page:
http://www.kombisales.com.au/kombi-for-sale/sunny-1975-vw-kombi-microbus-righteous-kombis
We get a lot of enquiries from proud Kombi owners who are ready to part with their pride and joy. Often they would like to know how much they are worth before listing an ad. There is a rough benchmark that I still use - a good mechanically sound and registered, running Kombi may cost between $7000 - $10,000. If the paintwork and the upholstery are in great condition then maybe $10,000 - $15,000. They are like houses - they will sell for what someone is prepared to pay.
Then you venture into the area of Kombis that have been resprayed. There are good spray jobs and crap spray jobs. A crap spray job will actually send the price backwards, but if there are no ripples or orange peel in the finish, and the seals, rubbers and trims have all been replaced, you are looking at a comfortable range of $20,000 - $25,000. If that sounds like a lot, it's because Kombis are SOOOO BLOODY BIG! They need lots of repairs, lots of primer, lots of undercoat and lots of 2Pak. Did I mention LOTS of sanding back in between each coat?
The worst thing you can do, is not get a mechanic or inspection company to have a look at the Kombi BEFORE you buy it. These inspections cost between $200 and $300, but they will save you from buying an expensive money pit, or at least reassure you that it's safe to drive home in.
Here is a run down of a recent pre-purchase inspection we had done on a 1975 Camper:
- Body Condition Average.
Paint Faded
No Major Panel Damage.
Has Had Several Minor Repairs.
Engine Bay Wiring Tidy Up Required.
Petrol Pump Leaking Fuel.
Water Under Passenger Floor Mat, Possible Windscreen Leaking.
Petrol Leaking From Carburettors.
Left Hand Rear Wheel Cylinder Leaking Onto Brake Linings - Complete Rear Brake Overhaul Required.
Both Rear Brake Drums Over Size.
Left Hand Flexible Brake Hose Missing Retainer Clip At Wheel.
Front Brake Pads Worn - Replacement Required.
Brake Pedal Rubber Worn.
Drivers Seat Belt Frayed And Webbing Damaged.
Left Hand Seat Belt Unit Mounted Incorrectly.
Accelerator Pedal Only Has 1/4 To 1/2 Travel.
Engine Miss Fire Under Load.
Right Hand Front Shock Absorber Leaking.
Front Shock Absorber Lower Rubbers Split.
Front Shock Absorbers Not A Matched Pair.
Steering Box Adjustment Required.
Right Hand Lower Ball Joint Has Movement.
Excessive Play In Front Wheel Bearings.
Right Hand Front Tyre Rubbing On Suspension Arm At Full Steering Lock.
Left Hand Rear Tyre Worn On Inside Edge.
No Ignition Lights In Dash.
No Speedo Or Warning Lights Work In Dash.
Left Hand Reverse Light Not Working.
Windscreen Wiper Rubbers Require Replacement.
Right Hand Exhaust Mount Bolt Broken.
Various Engine Oil Leaks.
How much would you pay for a Kombi like that? It was advertised for $10,000. I'm glad we ran the inspection because I was hoping to drive it home from interstate!!! Once you consider the mechanical and electrical work involved I reckon thats a $5000 Kombi. If it sounds too good to be true, then it probably is.
Back in 1998 I was restored my first VW Kombi - an 1800 panel van with webber carburettors - she used to go like the wind... OK, more like a big white brick plowing its way through a gale, but fast nevertheless. My biggest headache was that there was no seat in the back - or a bed for that matter! My surfboards and partner at the time deserved better. It took a LOT of stuffing around and knockbacks from the RTA before I finally got a working solution.
You may have your own reasons, in fact many of the original rock n roll beds are now failing, unsafe or simply not big enough for those who desire a bit more leg room. So where do you start once you've had that lightbulb moment, and decided that your deserve something more in the back?
The first thing to consider is your complaince plate or rego papers. Do they say 2 seats or 5 or 9? If you are in possesion of a valid 5 or 9 seater kombi, then you might say that you're kind of in the clear - Just go and buy any aftermarket seat and get it installed - there are plenty to choose from for $600 or less. If your Kombi has been continuously registered as a 5 seater or more, the motor registry assumes you havent messed around with the fittings, and you should be "OK" if you're in an accident.
But what if you only have a 2 seater Kombi? Maybe you want to carry young kids in the back? Maybe you've heard that some of those aftermarket beds are not ADR (Australian Design Rule) compliant. How do you install a solid rock n roll bed that will pass safetey inspection and get your family on the road? We've done a few of these now, and each job has had its challenges.
1. Get a bed/seat - We have been using the ADR compliant bed frames that are made by Kustom Kombis on the Gold Coast. These are the only legit bed frame we've found that can be used for either a T1, T2 or T3 Kombi. The soliution consists of the 2 brackets, frame, 2x boards and foam and fittings. Price - $950 incl. freight.
2. Find a good upholsterer - We have used a couple of auto trimmers over the years - The key issue is to ensure they understand the design you want. The price will depend on the complexity and the finsh you want. Spend some time looking at other peoples seats, checkout Google images or your mates Kombi magazines. The price will range upwards from $700 incl. a matching rear cushion. Make sure you check in on their progress - we have done 7 or 8 now and its important to be sure that everything lines up and looks right. Often they can take 6- 10 weeks before they can fit you in.
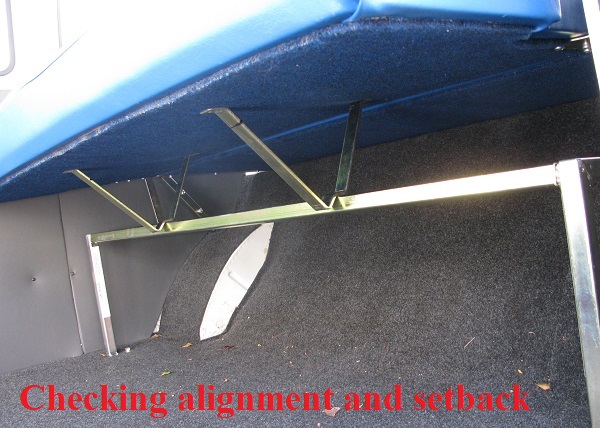
3. Order your seatbelts - You will need 2 static shoulder mounted belts (one for each side) and a middle lap belt. Make sure you have brand new seat belts that have been fitted with a white ADR label. Cost $300. We use the Seatbelt King for most of our seatbelts. Panel vans and 2 seaters often had the 10mm bolt holes for the shoulder mounting bogged and sprayed over in the factory, but these can be drilled out and cleaned to reveal the standard holes with an embedded nut inside the body of your Kombi.
4. Find 2 x seatbelt lifter brackets - These brackets lift the shoulder mounted seatbelts up above the window line, and in line with your seat back. They will help with the angle of restraint in an accident.
Good luck finding these, as most people throw these away when they first remove a seat from the back. The last few we had custom made at a fabrication workshop for $90 pair.

5. By now you have all your elements ready to assemble. Fit the seatblet lifter brackets and seatbelts first, as they are much harder to bolt in around a bed frame. Then drill your holes and install the bed frame (instructions are supplied). You might realise that your upholstery guys have stuffed up, as its only NOW that the pieces are coming together. Don't worry, it's part of the fun!! Fitting the frame and belts normally takes us about 3 - 4 hours depending on the job, so budget $250 for labour or use your own time and effort.

6. Whether you have kids or not, an automotive engineer will want to see child harness securing points in the back. Its the law. So you can either secure these bolt points above the engine bay (which messes with your rear cushion) or you can get a crab bar installed by a professional installer for $450.
7. Now you are ready to have an automotive engineer signoff on your work. These guys can be found on the RTA website. They will charge you $500 to inspect and certify that the car is indeed safe to seat 5 people now.
Obviously this all adds up - You're looking at over $3000 just to get a basic, child friendly, but street legal solution. I don't mean to scare you off in any way, rather its better you approach any project with your eyes open and with a clear expectation of the end result. Maybe you have more questions than answers - just drop us a line at info@righteouskombis.com.au
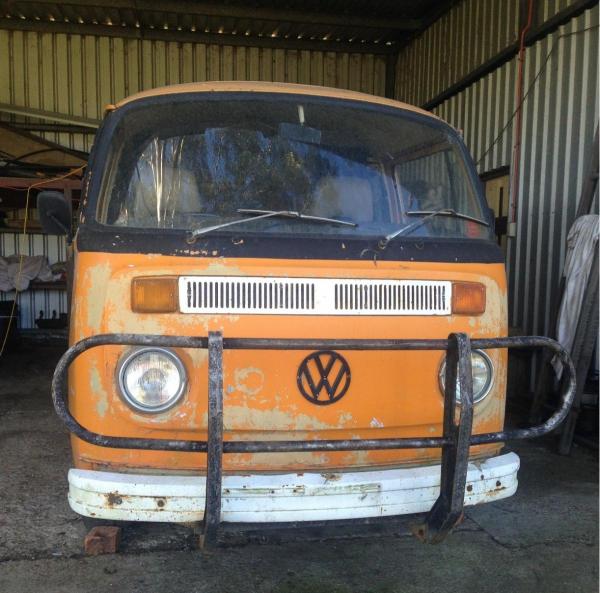
Originally we referred to this kombi as "The Honey Badger". It just seemed to have that kind of "I don't give a crap" kind of attitude. His undercarraige was loaded with bucket loads of mud from the unsealed roads around Bulahdelah. He had a few scars and some wounds that had been covered with a generous helping of bog and lashings of house paint. As usual the quarter windows were rusted out, but overall, his body was straight, and his bones looked pretty solid and free from rust. Purchase price $1500 - no motor included.
While the engine bay was empty we got stuck into the battery trays and drained the fuel tank.This is one of the hardest areas to clean and gurney. I have never enjoyed the task of removing the black tar that is used to seal the welds which has cracked and shrunk over time.
Worse still is the process of cleaning years of caked on grease and road grime. Every surface needs to be rubbed back and prepared before finally applying fresh seam sealer and a few coats of 2pac. Nice! Thankfully my mechanic had just finished rebuilding a solid 2 Litre engine that would marry up to the existing gearbox, so now we have a running Kombi with a nice clean engine bay.

A few other details needed to be sorted out like new ball joints on both sides, new brake calipers, starter motor, CV joints and some electrical issues that had our VW specialist scratching their heads for a week! The engine was running pretty rough at first, but the boys from Nymeyer were right across it and soon had our kombi purring like a kitten.

The front nose of our kombi also needed serious attention, as we discovered a minor crack that revealed a frontal impact that had been repaired with INCHES of bog. The workshop was filled with dust and rust as the grinders set to work. The more you grind the more you find, and the Honey Badger was no exception. The A-pillar (next to the windscreen) needed a cut here and a weld there, and the doglegs needed some attention as well. I'll admit that by the time we had addressed all the damage and rust affected areas, there wasn't too much of the original colour left behind.
In fact, by the time the primer and undercoat had been applied, our kombi looked nothing like the original Honey Badger. This is when Louise paid us a small deposit and asked if we wouldn't mind painting him turquoise - just like a lowlight project we finished 1 year ago called the Eagle. Hmmm, another name change might be needed... How about Ariel? As soon as we applied the first coats of paint, the name stuck.
As far as the interior goes, we had to sand and prepare every inch of the inside cabin, before the roof supports and window areas could be primed, undercoated and finished in the off white 2pac. We do this to brighten up the interior and to create more 'space'. This is offset with a flecked grey marine carpet that still brightens the interior and allows anyone with a spiked hairdo to wreak havoc on the roof. Some new interior lights and we are almost done...

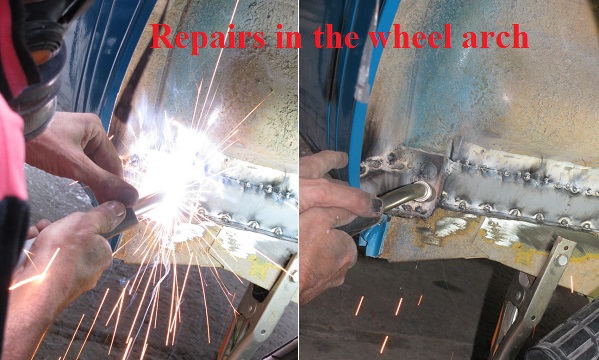
Even when we thought the worst was over, my panel beater kept finding areas that had been hidden by years of caked on mud! There is always a hidden easter egg that will make you go back and do more repairs - like inside the wheel arches, and under the front seatbelt mounts. The inside floor pan was stripped back to bare metal, new seam sealer applied in the corners, and a layer of stone guard applied to protect from further damage.
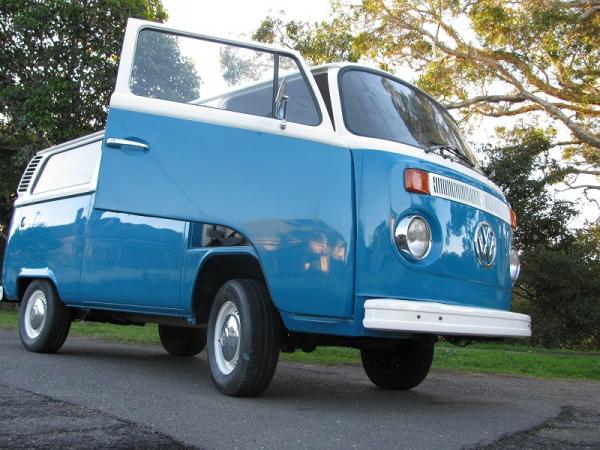
I believe we spent at least $2000 on new rubbers, fittings and parts to help the brand new paint job really stand out. As an 8 seater microbus, we didn't even have time to get the seats recovered on this project, but the new owners have already started that process. We have fitted a brand new ADR (Australian Design Rule) compliant rock n roll bed in the rear. We'll add new seatbelts and the all important brackets to lift the seat belts above shoulder height....
I hope the new owners like her as much as we do!
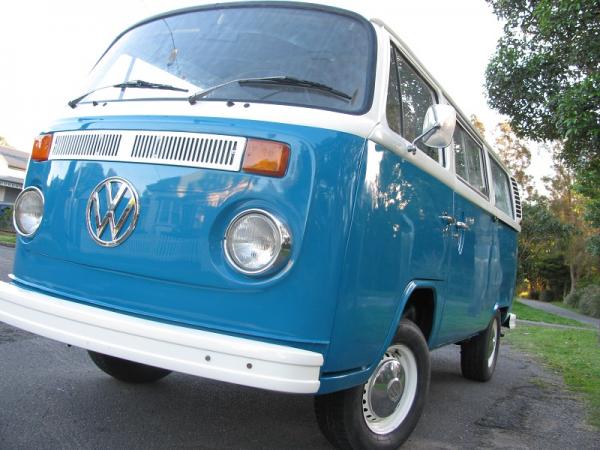
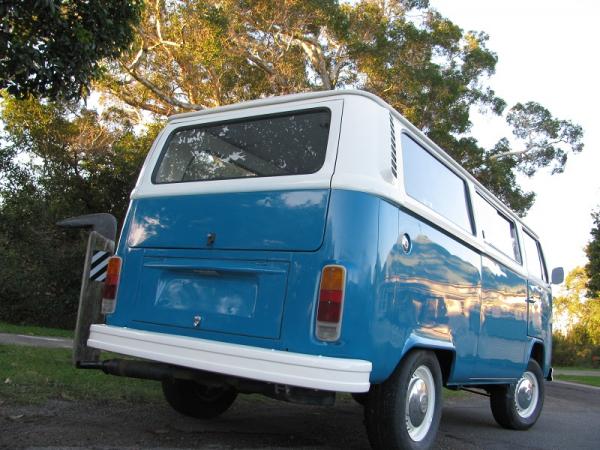
This is Sprout. A Kombi that started life as a 9 seater deluxe microbus with full headlining and interior trims. We have just finished restoring her for a client in Brisbane - who saw it for the first time on completion.

I was initially taken by the fact that she was a complete, original Kombi that had not been mucked around with, resprayed or bogged in the usual places. A very straight body with no dents, but I do remember the seller mentioned, "its just got a bit of surface rust". The original 1600 engine was missing, but thankfully We had just finished rebuilding a nice 2L engine that was looking for a home. I knew that there were some sections that needed some TLC, but overall I thought she was a good starter.

At this stage, I can introduce Craig, who was looking around for his dream Kombi, but couldn't quite decide whether to buy an existing project or to start from scratch and get a design that met his exact requirements. Craig just wanted a nice green and white kombi that he could use to take the family camping and fit his surfboards into. It needed to be able to sleep 3 people in comfort, and have seating for 5 people.
Despite the fact that Craig was in Brisbane, and we are 800km away in Newcastle, I though we could still provide a project brief, and keep Craig up to date with the usual photo diary that we create for every Kombi that we restore. A bit risky considering the first opportunity that Craig would get to see his new Kombi would be the day he flew down to take delivery - and then drive it home. We introduced Craig to some of our past clients, and within a couple of weeks a budget was agreed to, and we started work.
As we began to dismantle and label the working parts, we noticed that there were a few areas that needed a cut and repair:
· A minor section on the rear roof
· The back floor was severely compromised where it met the front seats
· The left and right door steps needed repairing
· The drivers side door had completely disintegrated below knee high
· The tailgate was badly rusted
· Some rust in the front wheel arches
· Just a little surface rust on the front nose cone
· and there seemed to be some rust hidden behind that front bumper
Thats not much - is it?
OK, YES IT IS!

The scary stuff was hidden behind that front bumper. As we cut and ground our way back to the chassis, it became obvious we would need a new inner front skin + an outer front skin. Thankfully these pieces of steel are readily available, and soon the welder was hard at work.
As we worked our way up the front nose cone it became obvious that the windscreen channel had also rotted away , as well as a few areas near the headlights so more welding was needed. Surface rust my ass!


Inside the Kombi, the dashboard was badly rusted, so a new dash was purchased & fitted. We decided to keep the original deluxe doorcards as they were in such good condition. However that beautiful, original headlining was water damaged around the window line, and there was little we could do to remove the brown stain. Another judgement call, and sadly we had to rip it all out – the headlining, the sound deadening mats, and all of that bloody glue! The roof supports and interior were completely resprayed, and a nice marine trim was refitted to the ceiling. At the end of the day, no surfboard fin will ever damage that finish.

We also sourced an ADR Rock n Roll bed from Kustom Kombis on the Gold Coast. These are a safe way of providing a nice comfortable full width bed that converts into a solid 3 seater. The kick panel was designed to fold down so that someone sleeping on the floor might have some more leg room. It depends on your engineer, but we always fit the seatbelt lifter brackets on the sidewall of the Kombi – this ensure the belts are above shoulder height.

As for the undercarriage, we started by giving the fuel tank a full steam clean, and a gurney underneath and in the engine bay. The black tar that seals the welds and framework was falling away and rotten, so this was replaced with a new sealant and the signal green 2Pak was applied over the top. She was now ready to receive our 2L engine and gearbox.
Up front we fitted new ball joints on the left and right, while also fitting some later model brake callipers to the 72 front end.The brakes should have been easy – but then we discovered that a previous owner had put what looked like engine oil in the brake system. After some serious head scratching we ended up flushing the entire brake system – twice.
The electrics had us baffled as well. What was previously a fully functional system, started to short circuit, and then fail as we had bumped a few wires during the refit. Our trusty indicator stalk gave up the ghost and the starter motor wouldn’t kick in. If I could time travel back to 1972 and grab the engineers by their neckties, I would be asking them to put an inline fuse between the indicators and the indicator stalk!!

After 3 months of hard work, things started to come together. Craig was flying down from Brisbane with his family to drive Sprout home, and we still had work to do. I felt like I was stuck in an episode of Masterchef or something, because it went right down to the line. The road trials were going well but we still had work to do on those brakes…

2 days later and I received the following text from Craig, “1 pull over from the cops. 1 thumbs up from a road worker. 2 peace signs from passing Kombis. Plenty of looks!... Great drive back, even if a little slow. Thanks for enabling our dream to be realised.” Phew!
In July 2013 we started work on a 1971 Ex-Army VW Kombi Lowlight microbus. You might remember we posted some "before photos" to give some kind of benchmark that indicates where we started. Most of our Kombis take about 3 - 4 months from start to finish, but this lump of coal needed some extra polishing before we could make her shine.

We thought there was just a bit of rust in the passenger door and above the rear wheel arch, but the sandblaster found a few extra surprises for us. As each panel was taken back to bare metal, a decision needs to be made: Do we keep this and repair it or simply replace with a better panel altogether? We prefer to keep the original doors and panels, as it means the car will go back together again without the worry of something not being the original fit. Sometimes its easier to just cut your losses and grab a part from one of the donor Kombis.

Lots of tiny pin sized holes along the lower front nose indicated that she was badly affected from the inside - all of the lowlights we have restored seem to suffer from this problem. A few gentle cuts revealed that it was only the outer skin that needed to be repaired. The doors, sills, and doglegs were all compromised. We usually remove a much larger section than needed to ensure we thoroughly remove any affected areas, and to ensure we are working with good metal.
All the doors, fittings and panels were taken back to bare metal, repaired and treated with a rust converter/primer/sealer and then sprayed with primer. Each area gets a generous spray of fish oil to prevent further decay. We can then start looking for imperfections that will affect the finished product - these are usually filled and then a guide coat is applied to find the really small stuff that you only see after the car is painted. More sanding, and more filling, and then we can apply the undercoat. Finally the 2Pak goes on and a cut and polish gives the final result. A good example is how this banged up rear valance for the engine bay polished up to brand new!

The roof was fully headlined when we started, but it was badly torn and ripped, so the whole lot had to come out. Under the headlining, each section of roof has a hessian mat glued to it, in order to reduce noise and vibration. Unfortunatley, the roof had started to decay where the glue and 40 years of condensation had taken their toll. This meant we had to strip the inside of the roof back to bare metal (try doing that one day yourself) and treating with more rust killer, before we could respray the arches white and apply a tidy marine carpet to the roof panels.

We gave the underside a good gurney, and then checked the chassis (OK), steering (OK), suspension (OK), brakes (ummm)... a new master required + both slave cylinders, a line flush and new front calipers, and then the engine and gearbox. My mechanic had a lovely 1600 that he had replaced the seals on and fitted a lovely Empi quad exhaust to. It purrs like a kitten, so to make sure we have no dramas, the fuel tank was removed and cleaned with all new lines - clamped firmly into place. Thankfully those pipes fit just below the new bumper.

The finishing touch is always the seats and bedding. In this case we used an Australian Design Rule (ADR) compliant rock n roll bed from Kustom Kombis for the 3 seater fold out bed. Newcastle Custom Trim came through with the goods again, by fitting up 2 old front seats that we had sitting in the yard. New foam, a couple springs repaired and even matching headrest covers to complete the look. This was continued into the back, so the straight lines go right through the Kombi. We finished all the doorcards ourselves in black, to match the checkerboard floor.

The finished Kombi is designed to look understated, but with the refinements of white wall tyres and the dashboard has been finished in off white as well. The sound system is the final touch, but we have yet to see what goes in at this stage. The 2Pak grey has a flattening agent to reduce the shine, and give a low maintenance finish. I'm sure the new owners are looking at curtains to brighten the overall effect. I hope you like it, cos we spent 6 months getting to this stage - phew!


All good things come to those who wait! It's been a 3 month long process, but today we put the finishing touches on Orange Crush. The devil is always in the detail, and this little charmer was no exception. Our original brief was to remove any rust, freshen up the faded orange paint job, and fit some new front seats with a new rock n roll bed - Easy!
We ended up removing the poptop and making serious repairs to the roofline, which of course led us to reupholster the poptop canvas and new headlining throughout the Kombi. I should give a big thankyou to Newcastle Custom Trim, who came up with the goods yet again. Along with the new seats and a beech floating floor, the look is now complete.
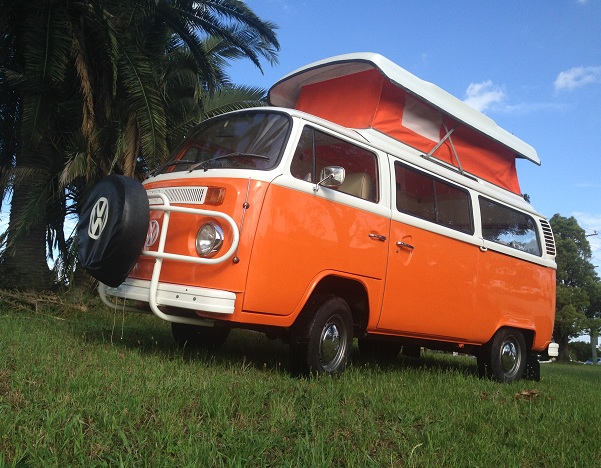
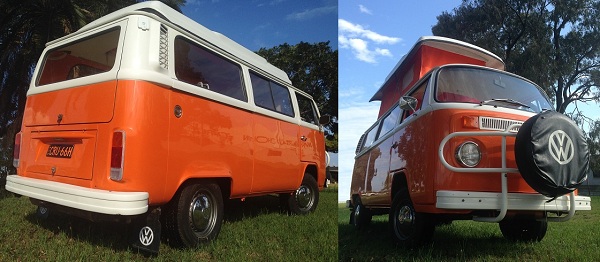
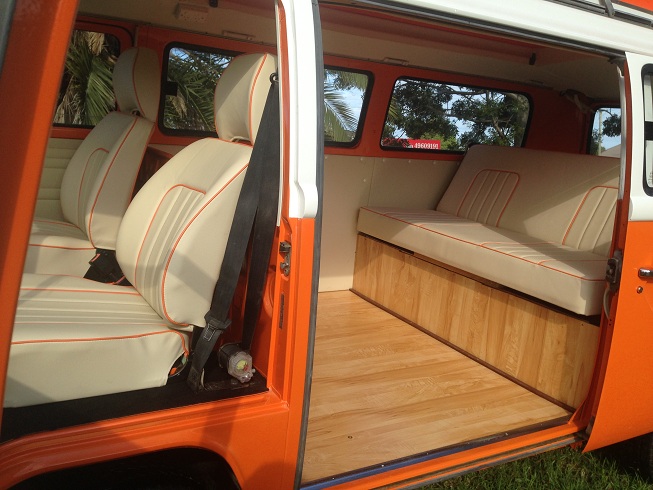
In addition to the paint and interior refit, we've added a dual battery setup with input for a solar panel so she will never run out of fizz. We have also fitted some nice slim line LED interior lights to ensure there is plenty of light along the interior of the Kombi.
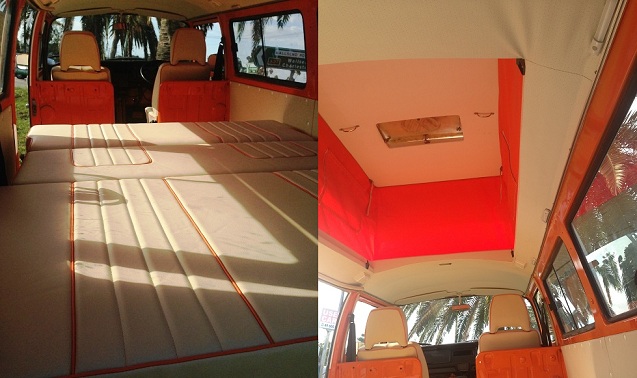
We have added some new sliding windows to improve the ventilation, and fitted all new door cards to match the colour of the seats - nothing over the top, but clean and elegant. Brand new seatbelts have been fitted in the back, along with the all important shoulder lifters that help the belts clear the rear seat back. This is an Australian Design Rule (ADR) rock n roll bed, that is rock solid and complies with current requirements for carrying 5 passengers - in style.
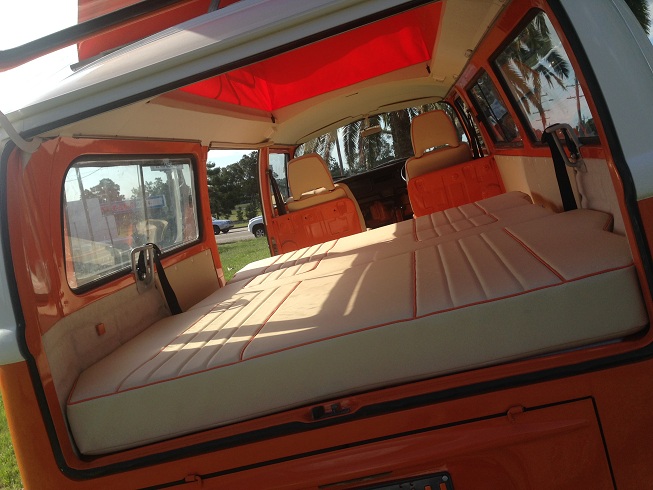
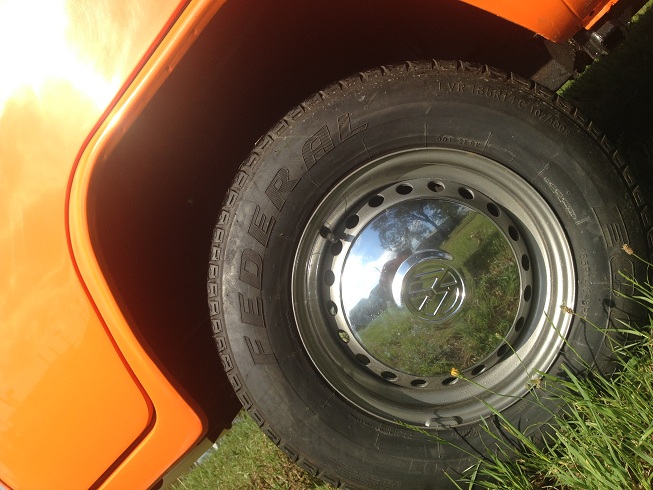
Even the bull bar was removed, blasted and resprayed, along with the rims that were finished in a simple gunmetal grey. All new window rubbers and fittings combine to make this one of the sexiest VW Kombis we have done yet. Keep your eyes peeled and be sure to give the owners a big wave when you see them cruising down the street.
About a month ago, a VW Kombi caught fire on Parramatta Rd, Sydney, and burnt to the ground. There was no explanation as to what caused it, or how the vehicle had been maintained. 
Since then, I have been mulling over the problem, and trying to determine whether it is a problem specific to air cooled VW in general, or do all cars suffer this fate due to bad maintenance?
I have come across many Kombis now that all have a fire extinguisher fitted as part of their standard equipment. It makes sense, especially in campers where you have a cooker, fridge, or other electrics that may cause old and brittle wiring to overload.There is a good case for replacing the electrics when you restore and renevate that 40+ year old Kombi that will now be your pride and joy.

However this still does not address the issue of a fire coming from the engine bay. For many of us that have owned a Kombi, we simply fill up with fuel, put the key in the ignition and expect it to work. However there are a couple of simple things you might want to take a look at next time you open your engine lid.
First of all check your fuel lines. They should be dry (not wet with leaking fuel) and free from cracks or freyed at the ends. Where they meet at each junction, they should be secured with a stainless metal clip, to ensure they don't pop off and spray petrol all over a hot engine/alternator. Confused about your fuel lines? Lets just say its a good idea for any rubber hose in the engine bay.
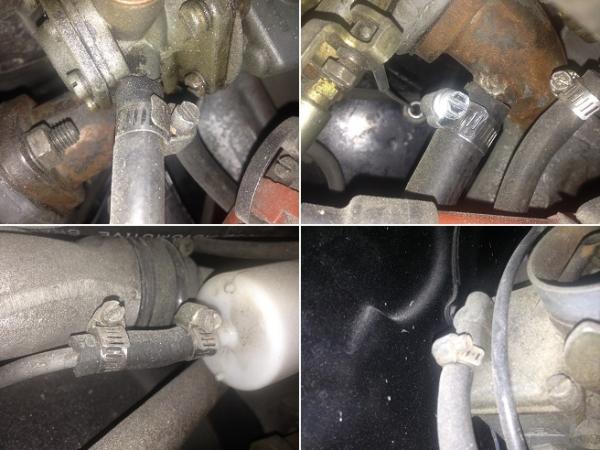
Secondly, you might want to check that no wires in the engine bay are old, cracked or worn. We've hopefully taken the fuel out of the equation but grease and insulation etc still burns. Its not just a VW problem - every car suffers from this once they get 40 years old.
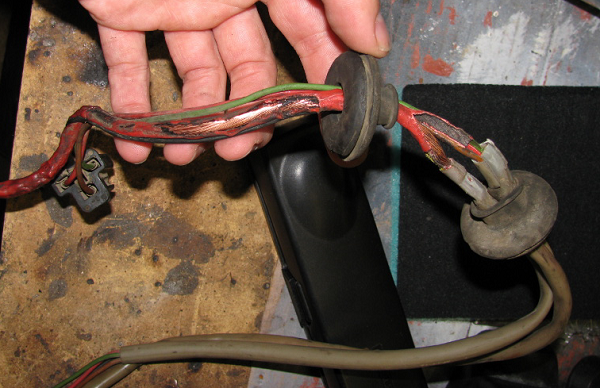
And finally, you need to remember that an air cooled VW engine is... air cooled. So any build up of grease, dirt or scale will inhibit the ability of your engine to cool itself from the surrounding air.
I'm not saying we all have the time, skill or tools to drop our engine out of a Kombi and remove the tinware to have a look at the build up of years of grease and crap, but if it hasn't been done for a few years, then it might look like this. Its like putting another layer between your engine and the cooling air that stops it from overheating. Every surface of your air cooled engine is designed to help it lose heat, and the tinware that surrounds it should be channeling that cool air into every nook and cranny.
This is an example of an engine that we pulled out of a Kombi a few weeks back. It needed lots of degreaser and attention with a scrubbing brush. You might even score a bonus spark plug that got dropped when someone was last trying to replace them.
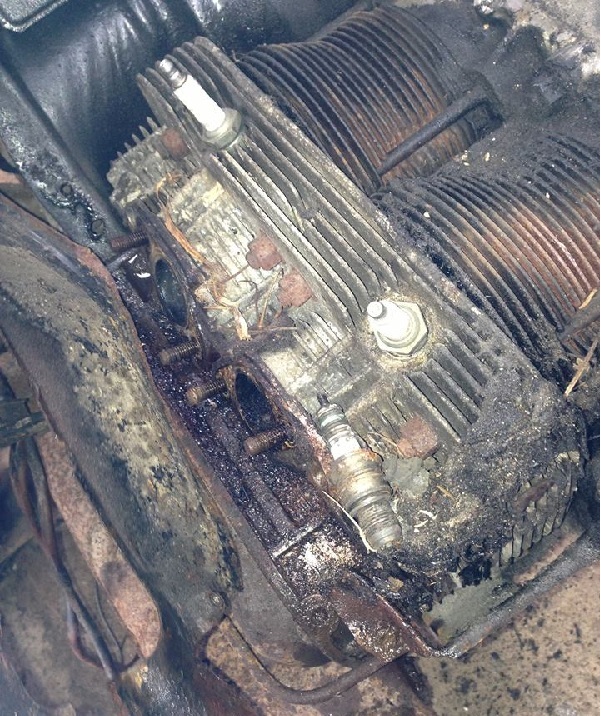
Even the rocker covers that protect your valves are designed to help lose heat, so if they are covered with muck inside and out, then your motor will be struggling to lose heat.
Now for some of you this might not be rocket science, but its worth putting out there to help prevent another burning Kombi on the side of the road. A little maintenance goes a long way. See you on the road!
We first met our Orange Camper about 2 months ago, and started working towards a brief that would result in a Kombi that would resprayed in original orange with a white window line and roof. It was to be enjoyed on a daily basis and taken to the surf, with a few modern touches like a new fridge, microwave and updated cabinetry. On first look, we thought that the body was in fantastic condition, with little or no rust that was very obvious. This one should be easy!!
After doing some research and creating a scrapbook of ideas, colour schemes and finishes, our client helped remove some of the interior for us, including some really uncomfortable bucket seats that were digging into his legs. The gas bottle, sink and water tank were all no longer required, as this space could be utilised for much better things - like a full width rock n roll bed! The poptop and headlining looked OK, so we decided to leave them in place. Then we removed the windows.

Alas, virtually every window sill was badly eaten away Front, sides and rear - in fact we decided to throw away the tailgate and salvage another from one of our donor Kombis. Whenever you get a camper with a sink, I can guarantee that the floor pan under the cupbpoards will be rusted, and this was no exception. In addition to this, as we started working our way around the car, more and more rust showed itself to be evident. At least the door steps looked OK...Actually no, they were really bad too. So methodically we worked our way around the Kombi, from the nose cone repairs, the side steps and the rear quarters that always seem to rust out. That gas bottle insert needs to be filled up too.


So far so good. All the repairs are completed, and now we'll just take a peek at that roof. &$%^^&%$#%$*%(*&)^ CRAP!!! That tiny little bit of rust, just seems like it could be worse that it looks, so the owner has agreed to go further and remove the pop top, and investigate - this means carefully removing the internal headlining, unscrewing 30 self tappers, and undoing all the electrics that supply the internal 240V system. What pleasant surprise awaits us?
Ok, so more repairs are needed, but at least we now have an excuse to install brand new headlining, electrics, and a new canvas for the pop top roof while we are at it. We can also get right into the roof gutters to treat and prevent any further rust from getting started. I am tempted to grind off the fiberglass edge from the pop top roof that rests inside the roof gutter and acts as a water/leaf trap.
At this stage we now have the car repaired, primed and ready for the colour. All the hard work has been done, and we'll post a few shots of the finished Kombi soon!

Introducing Ruby, a 1971 Ex-Army VW Kombi Lowlight microbus that was one of 9 Kombis that we purchased from Steve Muller of Kombi Rescue back in 2012. I knew this one was special when we started lifting up the floor and the paint was still shiny like the day it left the factory. Until now she has been waiting for a new owner with the right vision and a budget to restore her to something better than new.
I enjoy posting the before photos, to give some kind of benchmark that indicates where we started. So far we have spent a couple of days removing the glass, headlining, seats, seals and electrics. What blows me away is that this 42 year old car has no rust in any of the window sills, door steps or the usual spots where you expect them to fall apart. Just a bit of rust in the passenger door and above the rear wheel arch.
She has been prepared and marked out for the sandblaster, to ensure that there are no hidden nasties in those hard to reach places. The next stage will see us begin the repairs and priming while her new owners struggle to finalise the instructions for her final look and finish. We already have a well tuned 1600 engine with a twin exhaust that should slot right in the back. Stay tuned!!


Join our Facebook Page to receive exclusive updates & discounts!
Recent blog posts
- Sunny - 1975 VW Kombi Microbus by Righteous Kombis
- How much is a Kombi Worth? The value of a pre-purchase inspection.
- How do I Turn a 2 Seater VW Kombi into a 5 Seater
- Transforming a beatup 1974 VW Microbus into Ariel, the turquoise mermaid
- Restoring a 1972 Deluxe VW Kombi Microbus - Sprout
- How to Restore an 1971 Ex Army VW Kombi Lowlight - Earl
- A Day on the Green with Orange Crush
- Do VW Kombis really catch fire and why?
- Orange Crush - A 79 Camper restoration
- Ruby - The 1971 Ex Army VW Kombi Lowlight
